If you are new to check writing or if you have been using your debit card and ATM card for so long that you just need a refresher, it is a good thing to be familiar with all the various part of your
checks. This article will go over the anatomy of a check and explain each feature so that you are familiar with their function and role when you
write a check.
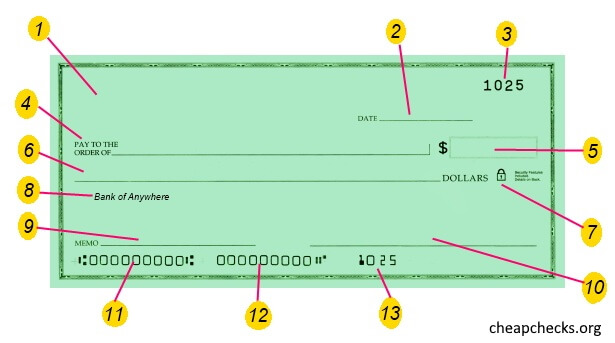
- Beginning at the top left of your check, you will see a five line area that personalizes your checks. Here is the place for your name and that of anyone else who jointly holds that account with you. Your address and other information such as your phone number or drivers license number can also be printed here.
- To the right of that area and still at the top is the area for you to fill in the date the check is written.
- To the right of that is the sequential number that identifies this particular check and will aid you in keeping your register accurate.
- Our next stop in the anatomy of a check is the Pay to the order of line which is below the personalizing information and this is where you will fill in the payee's name.
- A small box is next to that where you write in the dollar amount the check is written for. In this box you use numerals.
- Below and to the left on the amount line you write the amount in words with a fraction for the cents so that it is written in both numerals and words when you have filled it out.
- Next to the amount line on your check will be a padlock icon which refers to the security features that are in place to help prevent fraud.
- Beneath the amount line will be the financial institution information such as your bank's name and possibly their address.
- Moving down another level on our anatomy of a check tour we see the memo line in the lower left corner, this is for you to put a note that can help you identify that check.
- To the right of that is the signature line where you sign the check you have written.
- The next level down is the bank's routing numbers. One fact to know about routing numbers is they always begin with either a 0, 1,2 or 3.
- To the right is your bank checking account number.
- Finally further to the right is the check number.
This concludes our tour of the check!